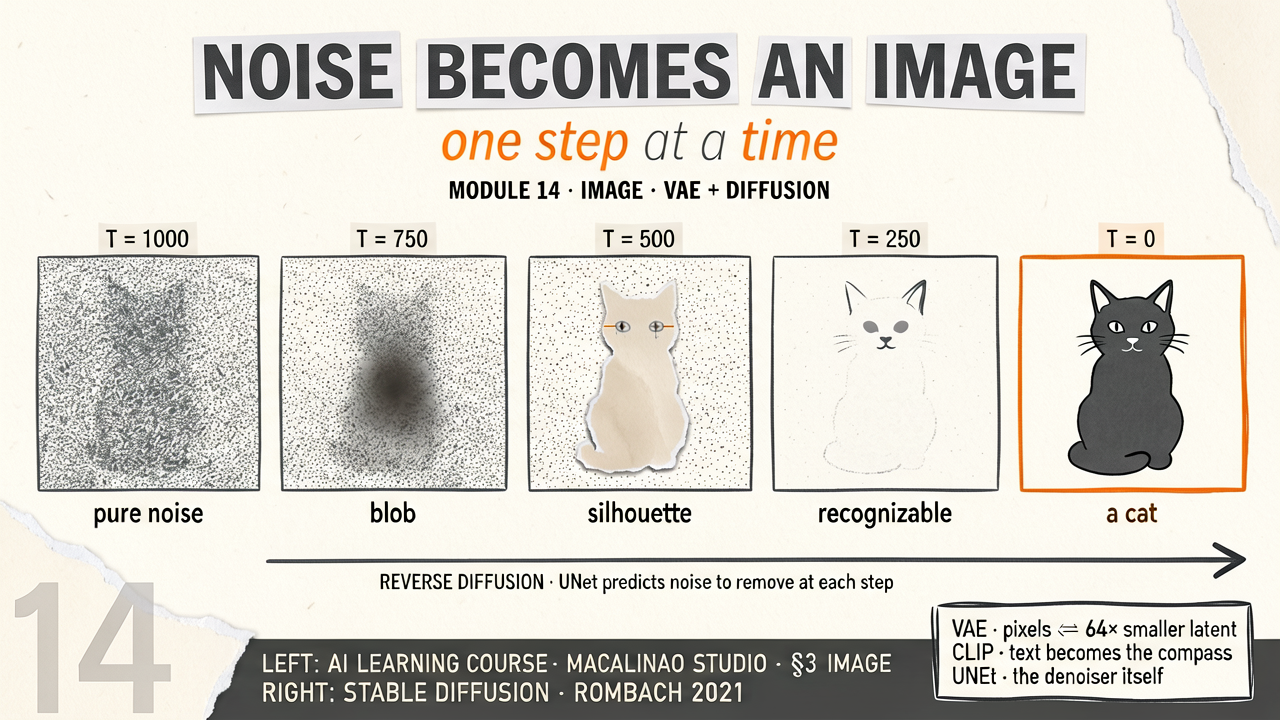
If you tell an AI "draw a cat", it has no hands and no imagination. But what if you take a picture of a cat, and slowly add "static" (like a broken old TV screen) until the cat is completely gone?
As you do this, you force the AI to watch. The AI's only job is to try and guess what the picture looked like one step before you added the static — in practice, the network predicts the total noise (ε) or the velocity at each step, not literally the previous frame. It learns to "un-smudge" the noise. This is called a Diffusion Model.
Interactive: The Denoising Process
1. Drag the slider to the right to completely destroy the picture until it's just pure Random Noise. 2. Then, click "Reverse Diffusion (AI Un-smudge)" to watch the AI mathematically peel away the noise and generate a brand new image from scratch!
Why it's so fast
VAE (The Zip File)
If you look closely at a 4K image, there are over 8 million pixels. Un-smudging 8 million pixels one by one takes forever!
Enter the Variational Autoencoder (VAE). It acts like a ZIP file compressor: it shrinks the giant image down into a tiny, mathematical "Latent Space". The AI adds static to this tiny file instead of the huge image, which makes rendering fast enough for standard home computers.
One caveat: unlike a real ZIP file, the compression is aggressively lossy. The VAE throws fine detail away — which is exactly why small text and distant faces degrade in diffusion outputs. The "zip file" picture is for intuition only.
Controlling the Art
Text Prompts (CLIP)
How does the AI know it should un-smudge the static into a Dog instead of a Cat?
A text encoder (CLIP's, in classic Stable Diffusion) turns your prompt into a set of vectors. The denoiser was trained with those vectors plugged into its cross-attention layers, so at every un-smudging step it looks at your prompt and shapes its prediction to match. The conditioning is built in during training — the model isn't being steered toward a CLIP score at runtime. Modern models swap CLIP for larger T5 or LLM text encoders, but the mechanism is the same.
Then
U-Net denoisers conditioned on CLIP text embeddings — the SD 1.5-era recipe this lesson teaches.
Now · June 2026
Flow-matching diffusion transformers (FLUX.2, Qwen-Image, SD3.5) with LLM text encoders are the production standard; the un-smudging intuition transfers directly.
§ 02
The playground.
Theory above, instrument below. This interactive panel runs live in the page — drag, type, and watch the mechanism respond.